To keep a lawn that is weed-free and lush, it is necessary to plan and carry out a variety of chores in the appropriate manner. In the context of weed management, determining the appropriate time to spray weed killer about mowing is an essential component. Although both of these actions are necessary for maintaining the health and aesthetic appeal of your lawn, the times at which they are performed can have a major impact on how effectively they are carried out.

In this article, we will discuss the controversy that surrounds the question of whether it is more effective to spray weed killers before or after using a mower. When you have a thorough understanding of the science behind the growth of weeds, the mechanics of common weed killers, and the dynamics of the mowing process, you will be better equipped to make decisions that will help you obtain the best possible outcomes from your lawn care routine.
Please come along with us as we delve into the complexities of weed management and lawn upkeep, offering you insights that will assist you in developing a landscape that is weed-resistant and verdant.
There is no universally correct time to apply weed killer about mowing because the timing is dependent on several circumstances. You should consider the lawn’s condition, the kind of herbicide you’re using, and the weeds you want to eradicate before making a final decision. Let’s have a look at the factors to think about in both cases:
The conditions of your lawn will determine whether you should use weed killer before or after you mow. If you want to know whether strategy is more suited to your needs, try out both approaches and see what happens. For the safest and most effective application of herbicides, always refer to the label directions.
Spraying weed killers or herbicides onto a lawn, often known as lawn weeding, has multiple useful functions in keeping the grass in good health and looking good. Let me summarise:
Keep in mind that knowing what kinds of weeds are there, choosing the right herbicide, and applying it correctly are all crucial for effective weed control. For a more holistic approach to lawn care, weed spraying can be supplemented with integrated pest control measures, such as ensuring healthy grass and implementing cultural practices. To make sure you use a herbicide safely and effectively, read the label directions thoroughly.
Because it serves multiple purposes, weed spraying on your lawn is a crucial component of excellent lawn maintenance that enhances the overall health and attractiveness of your outdoor space. Spraying for weeds is necessary for a variety of reasons, including the reduction of weed competition, the enhancement of the aesthetics of the lawn, the promotion of the health of the grass, and the prevention of illness.
Smartly utilising herbicides to eliminate unwanted weeds presents an opportunity to provide your grass with the nutrients it requires to develop into a robust plant. This technique is also helpful in preventing the introduction of invasive species, which is an excellent way to ensure that the biodiversity of your landscape is maintained. Treatment of weeds at the appropriate time also contributes to the efficiency of lawn management, which results in less labour and more time saved.
The selection of the appropriate herbicide for the type of weed, and the use of the herbicide by the utilisation of integrated pest management strategies are all essential components needed to achieve the desired outcomes. It is essential to maintain the health of the grass by routinely watering, fertilising, and mowing it. In addition to spraying for weeds, this is also a vital step.
Before beginning to care for your grass, you should first consider what it demands, then experiment with a variety of different things and see what happens. You can construct a robust lawn that will endure throughout the entire year if you use a methodical approach to weed control, which includes spraying with caution. To ensure your safety, you should always follow the guidelines on the labels of herbicides and take responsibility for the management of your lawn.
Want to know more? Just check my blog here!
Upholding strict standards of cleanliness and protecting goods from insect infestations is of utmost importance in the complex food sector. In addition to being required by law, a strong pest control program is an essential component in guaranteeing that food is safe to eat. Both the company’s image and, more importantly, customers’ well-being are endangered by pests.
To address the particular problems encountered by the food industry, this article explores the complexities of developing a successful pest control program.

As a whole, we investigate ways to strengthen the food industry’s defences against pests, from learning about the most frequent pests that infest food facilities to developing preventative measures and using sustainable eradication techniques. If we want to keep our food supply chain safe, we need to implement a pest management strategy, so come along as we peel back the layers of that strategy.
To avoid, track, and control pest infestations in food processing, manufacturing, storage, and distribution facilities, a thorough and methodical approach is taken in a food pest control program. Because pests can contaminate food, undermine hygienic standards, and damage facilities, minimizing their dangers is the major objective of such a program, which aims to guarantee the quality and safety of food items.
Important parts of a food-safe pest control program are:
Through the integration of these components, a food-related pest control program seeks to establish a watchful and preventative atmosphere that guarantees the safety of the food supply chain and the health of customers.
Pest control is an important part of any food business’s operations for several reasons, including ensuring the safety of their products, maintaining high standards of quality, and protecting their brand. Some of the most important reasons why a food business must have pest control:
Pest management is an essential part of keeping a food business’s reputation, health, and safety intact. Not only is it the law, but investing in a strong and preventative pest management programme is a smart move for the company’s future.
An effective pest management programme is essential for food businesses since it ensures the safety, quality, and reputation of their products, as well as meets regulatory requirements. Pests provide a variety of risks to the food business, including contamination of products and harm to their reputation as brands. Here are a few reasons why pest management is so important for food businesses, as we’ve discussed:
The most pressing concern, of course, is the security of the food supply. Pests are a direct threat to consumer health since they can carry diseases and pollutants. Pest control and prevention measures taken by enterprises help keep their products safe, reduce the risk of food poisoning, and guarantee compliance with health and safety laws.
Safeguarding a company’s standing in the market is of equal importance. Consumer trust and loyalty can be quickly eroded in this age of instant communication when word of a pest problem gets out. Keeping the space free of pests is an investment in the continued success of the business, not only a regulatory requirement.
In addition, quality assurance does not include pest management. The quality of food products is at risk when pests infiltrate raw materials, cooked foods, and even the packaging itself. Maintaining the high standards that customers demand from food businesses requires a proactive pest management programme.
Money matters are a factor as well. In comparison to the costs of a well-executed pest control approach, the costs of dealing with a full-blown infestation, which can include property damage and disruptions to production, are significantly higher. Saving money and ensuring operational continuity are two benefits that organisations reap from investing in preventive measures.
Following pest control standards is crucial because of the legal ramifications that might result from failing to do so. There are fines, closure orders, and possible legal actions that can come from not following pest management guidelines, therefore it’s in your best interest to adhere to these standards.
For more information, visit pest control in food industry.
Amid the rush and bustle of modern life, when concrete jungles dominate the landscape, the act of planting and gardening works as a revitalising antidote, re-establishing a connection between individuals and the essence of nature.
The benefits of gardening extend far beyond the aesthetic appeal of colourful flowers and verdant vegetation; it has significant implications for our health, the environment, and the community as a whole. In this article, the varied significance of planting and gardening is investigated.

The article delves into the physical, mental, and societal benefits that result from tending to a little plot of land. It is becoming increasingly clear that gardening is not merely a pastime; rather, it is a transforming journey that not only cultivates plants but also a deeper connection to the world that surrounds us.
This realisation comes about as we explore deeper into the origins of this time-honoured discipline. We invite you to work alongside us in uncovering the mysteries that lie beneath the ground and the abundant benefits that result from the straightforward act of planting seeds.
Beyond just making outside areas look nicer, there are many other reasons why gardening and planting are important. It covers a lot of ground and has many positive effects on people’s health, the environment, and community strength. The importance of gardening and planting is highlighted by the following, have a peek here:
Well-maintained gardens enhance the aesthetic appeal of neighbourhoods, public spaces, and private residences, contributing to a positive and uplifting environment.
Trees and plants play a crucial role in absorbing carbon dioxide and mitigating the impacts of climate change by acting as natural carbon sinks.
What makes gardening and planting so important is that it may improve our physical and emotional well-being, help the environment, bring people together, and provide them with the tools they need to make a difference in the world.
Because everyone has their own unique set of priorities in gardening, it’s not always easy to pick just one crucial thing. Having said that, there are a handful of things that every gardener must have to succeed. Of them, soil health is frequently considered to be among the most important. That’s why:
I feel it is important to point out that many factors contribute to successful gardening, but the health of the soil is especially important. Other essential considerations include the amount of sunlight, the management of water, the selection of plants that are appropriate for the region, and the performance of routine maintenance duties such as weeding and pest control.
Taking a holistic strategy that takes into account all of these variables simultaneously is the most important factor in ensuring that your garden is successful.
The numerous parts of gardening are something that one needs to become proficient in to have a successful and enjoyable experience with gardening. Even though there are a great number of other elements that contribute to the success of a garden, the health of the soil is the single most significant component in the cultivation of robust and healthy plants.
An ecosystem that is healthy in the soil is characterised by several characteristics, including the availability of nutrients, the retention of water, and the stimulation of microbial activity.
However, gardening is not limited to the act of cultivating plants in soil. This encompasses aspects like as psychological and physiological well-being, the preservation of ecological systems, social cohesiveness, and the creation of visually beautiful designs.
People are given a unique opportunity to work with their hands, gain knowledge about the natural world, and participate in the process of regenerative growth when they engage in gardening. This is one of the positive aspects of gardening.
Not only does gardening cultivate plants, but it also results in a deeper connection with the natural world. This is true whether you have a small plot of land in your home or a vast communal garden. The power of responsible stewardship to remind us of our interconnectedness with the environment and the extent to which we are dependent on it is a significant factor that highlights the necessity of responsible stewardship for a better and more sustainable future.
Not only are we enhancing the quality of our environment by activities such as tilling the soil, sowing seeds, and tending to our plants, but we are also establishing a more satisfying and well-balanced way of life for ourselves and the others in our immediate vicinity. The garden is a haven, a place of learning, and a blank slate where the magnificence of the natural world and the inventiveness of humans come together to make a masterpiece that is alive and breathing.
Entering your backyard would be like entering a verdant paradise where every plant is flourishing. A green thumb, a lot of experience, and plenty of patience are all necessary ingredients for a successful garden. It could be the ideal time to think about getting a professional gardener on board if you’re longing for a beautiful outside area but don’t have the resources to maintain it yourself.

Here, you’ll find all the information you need to locate and hire the perfect gardener to make your outside space a reality. We will help you make the appropriate decision by guiding you through the hiring process and providing useful insights into evaluating your garden’s needs. A talented and enthusiastic gardener will tend to your garden, and you can look forward to seeing it thrive.
If you want your garden to look its best but don’t have the energy or knowledge to do it yourself, a gardener is a great option. To locate and hire a gardener, below is a detailed guide:
You may have a nicely kept garden without the hassle of doing it all yourself if you follow these guidelines. Your outdoor space can be completely transformed and you can experience the joy of a flourishing and beautiful garden when you hire a professional gardener.
When it comes to a garden’s general health and aesthetic, a gardener is indispensable. Their knowledge and skill extend much beyond that required for basic garden maintenance tasks; they make substantial contributions to the health of plants, the beauty of outdoor areas, and the garden’s ecological sustainability. A gardener can lend a hand in the following ways:
To ensure a garden remains healthy and attractive throughout time, hiring a gardener is just the beginning of what they offer. With their help, homeowners may have a flourishing garden without having to learn all the ins and outs of gardening on their own.
If you want your outside space to look better and feel more alive, hiring a gardener can be a great choice. Throughout the year, these trained experts keep outdoor spaces looking beautiful by tending to plants, maintaining landscapes, and applying their extensive knowledge of gardening to a variety of problems.
A gardener’s contributions go well beyond the realm of mundane duties, encompassing soil management, planting, pruning, insect control, and further afield. A healthy and sustainable outdoor space is created when their expertise in local climate conditions and their capacity to customise services to your garden’s unique needs come together.
A gardener’s role extends beyond mere plant care to include that of an educator, providing helpful tips and tricks for keeping a garden flourishing in the time between professional waterings. As a result of this instructional component, homeowners can nurture a feeling of pride and contentment by cultivating a closer relationship with their outdoor areas.
Hiring a garden service allows you to relax and enjoy your outside space without having to worry about the constant upkeep it requires. This is in addition to the obvious benefit of a lush, well-landscaped yard. Hiring a gardener may make all your gardening dreams come true, whether you’re an avid gardener looking for advice or a busy person who could use a hand in the yard.
Are you looking for a trusted gardener in Doncaster? Look no further than lawn mowing doncaster.
Two expressions that seem interchangeable, “cut the grass” and “mow the lawn,” have been at odds in the landscaping industry for many years. Word choice can conjure various geographical, cultural, and linguistic subtleties, even though both statements convey the same core work of trimming the green carpet that surrounds our dwellings.
In the study, we probe the linguistic complexities that mould our understanding of yard labour, tracing the origins of these expressions and investigating the nuanced distinctions that explain why one is more common than the other in different parts of the English-speaking globe.

The decision between “cutting” and “mowing” goes beyond a simple semantic disagreement; it reveals the complex web of cultural influences and linguistic development that shapes our common language. Come us as we explore the world of grass and language, learning how this age-old linguistic mystery has been maintained via the influence of personal biases, geographical preferences, and history.
This exploration is sure to provide insights that go beyond just caring for your outdoor plants, whether you’re a language aficionado, a fastidious landscaper, or someone who just wonders about the complexities of everyday communication.
A lot of cultural and geographical factors influence whether one says “cut the grass” or “mow the lawn” when referring to exterior lawn maintenance. While both expressions mean cutting the grass in your yard, how you use them depends on things like where you live, what you prefer, and your language’s traditional usage.
The idiom “mow the lawn” is taken more seriously in various regions. Applying a lawnmower to keep the grass at a consistent height is the action that this statement highlights. In American English, it has become a common phrase to describe the act of tending to a lawn.
The fact that “cut the grass” is common in various parts of the English-speaking world is evidence of the variety of our language. Whether you use one of these expressions depends on your taste, family history, or the language used in your area.
For all intents and purposes, “cut the grass” and “mow the lawn” mean the same thing: you’re taking care of your exterior green space. Feel free to utilise the expression that feels most natural to you or accords with the linguistic standards of your community the next time you’re caring for your yard.
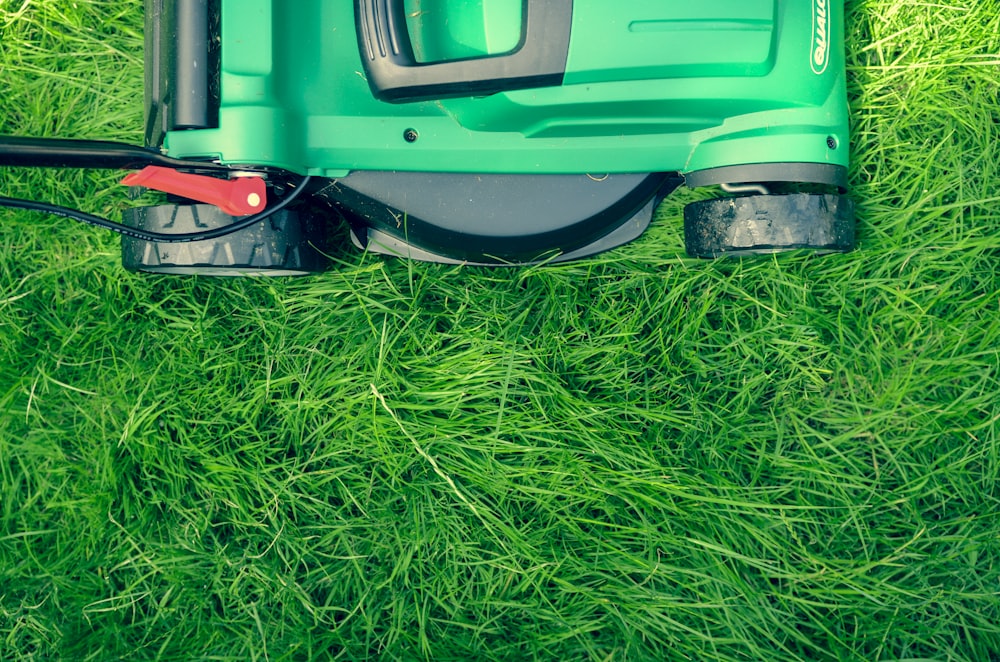
While cutting the grass is quite simple, a well-kept lawn is the result of meticulous attention to detail. The process of cutting a lawn can be broken down into the following steps:
Keep in mind that factors like grass kind, climate, and personal preference can cause the details to differ. To keep your lawn looking healthy and beautiful, it’s important to mow it correctly and tend to it often.
To keep your lawn looking good and healthy, mowing it regularly is an important part of lawn care. A few reasons why you should mow the lawn regularly are:
Mowing the lawn is an essential aspect of maintaining a healthy lawn, and it serves a practical purpose as well. If done regularly and correctly, it may help you grow a lawn that is healthy, resilient, and aesthetically pleasing, and you can enjoy it all year round.
Mowing the grass is an essential task that contributes significantly to the entire well-being of your outside area, going beyond just its appearance. Incorporating good mowing practices into your routine will help your grass in more ways than one.
Mowing your lawn regularly promotes healthy growth, which in turn strengthens the grass’s defences against pests, diseases, and other environmental pressures by strengthening the root system. To keep things looking neat, it’s a natural way to eradicate weeds before they go to seed.
In addition to promoting uniform growth and improved water and fertiliser absorption, mowing at the correct height eliminates problems like thatch accumulation and scalping. All of these are necessary for a healthy lawn, this method also helps the grass resist drought, promotes new growth, and enhances air circulation.
A well-kept lawn does more than just keep your feet dry; it also improves the visual attractiveness of your home and makes the outside feel more welcoming. At the end of the day, mowing is a preventative step that grows a lush, green lawn that you can be proud of and enjoy all year round. Mowing your grass is an investment in your outdoor oasis’s health, so think of it that way the next time you have to do it.
Are you looking for a trusted Lawn Mowing Service? Here’s lawn mowing heidelberg to help you! Book your appointment today!
Not only does the act of trimming and shaping a hedge improve the aesthetic appeal of your outdoor space, but it also helps to boost the health and vitality of the plants that are growing there. When it comes to the art of hedge trimming, precision and the appropriate method are required to obtain a clean and well-maintained appearance.
In this article, we will discuss the most effective methods for trimming a hedge, including the most important advice, tools, and step-by-step instructions that will assist you in achieving results that appear to have been done by a professional.
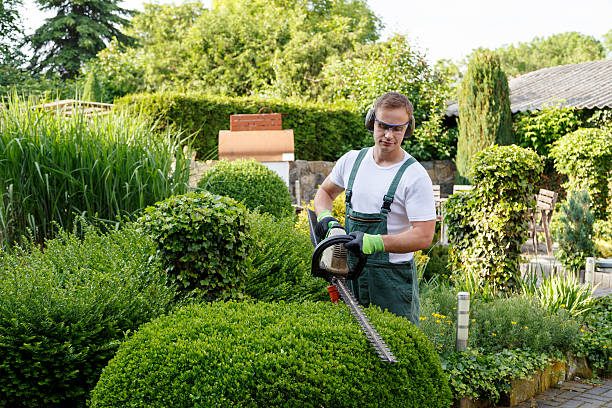
Your landscape can be transformed into a beautifully manicured haven if you learn the skill of hedge trimming. This is true regardless of whether you are an experienced gardener or still just starting. Let’s take a deep dive into the realm of hedge trimming and discover the factors that contribute to a hedge that is precisely manicured.
Understanding the unique requirements of the plants, using the correct method, and having the appropriate tools are all necessary for good hedge trimming. How to prune a hedge properly is outlined here:
Keep in mind that different types of plants have different specific needs when it comes to hedge cutting. For the greatest results, always follow the directions for your specific hedge species.
Depending on the goal, the hedge type, and the landscape plan as a whole, there are a variety of approaches to cutting hedges. A few examples of typical hedge-trimming techniques are:
Take into account the plants you have, your garden’s layout, and your preferred method of upkeep while deciding on a hedge-cutting style. To maintain a healthy and beautiful hedge, prune it regularly and appropriately.
Hedge cutting is an art and a science that is essential to the well-being, form, and beauty of your garden or outdoor area. The most important thing is to know what your hedge needs and then use the correct techniques, regardless of whether you choose a formal, informal, topiary, or any other design. Not only does regular trimming keep your hedge looking neat, but it also promotes strong development and protects it from problems like disease and barren spots.
Consider the season and your plants’ development trend when deciding when to prune. Before beginning to cut, make sure you have the right tools, put safety first by wearing protective gear, and lay out a detailed plan. The key to achieving the desired effect when trimming hedges, be it a more organic, natural style or a more geometric one, is consistency and meticulousness.
Keep in mind that various hedge species may call for different maintenance procedures, therefore it’s important to know what kind of hedge you have. The general well-being of your hedge depends on your regular upkeep, including correct watering and, on occasion, fertilisation.
By mastering the skill of cutting hedges, you may create a serene and aesthetically beautiful setting for your outdoor living space. Get your hands dirty, arm yourself with the correct information and equipment, and start cutting your hedge so it complements your garden and scenery.
Are you looking for more information? Click here hedge cutting services near me.
A well-groomed lawn is more than just an attractive boost for your house; it is a practice that is firmly entrenched in both aesthetics and plant health. Keeping your lawn in good shape requires more than just mowing it regularly. Mowing the grass has a varied purpose that goes beyond the simple aesthetic preferences of landscape design. This essential activity contributes to the general health of your grass, which in turn promotes resilience, lushness, and an aesthetically pleasing outdoor space.
In this article, we will delve into the numerous reasons why mowing grass is vital, studying its impact on the health of your lawn, the prevention of the growth of weeds, and the construction of an inviting outdoor atmosphere. Specifically, we will look at how mowing grass has an impact on preventing the growth of weeds. The science and the art of keeping a flourishing green carpet just at your doorstep can be revealed once you realise the significance of this seemingly everyday activity.
In terms of lawn maintenance and landscaping, cutting the grass serves various key purposes, including the following:
Mowing the grass is one of the most fundamental components of lawn care, which encompasses a far wider scope than its name might imply. Your lawn’s resilience, health, and overall well-being are all dependent on your ability to do so. Homeowners who have a grasp of the many different reasons for mowing can adopt practices that result in an outdoor landscape that is verdant, lush, and visually appealing.
There are a variety of advantages to using a professional lawn mowing service, and they all rely on your individual needs and preferences. Some potential benefits include the following:
While it’s true that hiring a lawn mowing maintenance service has many benefits, it’s also important to think about the money you’ll have to spend. To save money, you should compare the time and effort required to maintain your lawn on your own with the cost of hiring a professional service. Doing it yourself can save you money and be gratifying if you have the time and knowledge to devote to your lawn.
In the end, whether or not you hire a lawn mowing maintenance service will depend on your individual preferences, the amount of money you have available, and the amount of time you have available. The use of professional services results in a lawn that looks its absolute best since it saves time provides access to expert knowledge, and receives routine upkeep.
Those who already have a lot on their plates or who live in large homes may gain the most from this. The benefits and the ease of usage are both present, but the expenses need to be considered alongside the convenience.
If you’re the hands-on kind, have the time, and are willing to invest in the tools you’ll need to do it, taking care of the lawn on your own may be a gratifying experience. However, these conditions must be met. If you have a small lawn, taking care of it yourself can be a rewarding and cost-effective way to connect with nature, especially if you have a green thumb.
In the end, the goal is to strike a balance that is commensurate with your way of life, your tastes, and your financial situation. Whether it is done by professionals or by the homeowners themselves, the objective of lawn care is to encourage the growth of grass that is both healthy and aesthetically beautiful. This will increase the value of the property as well as its curb appeal.
Looking for a Lawn Mowing and Garden Maintenance in Doncaster? The answer is here! Just hop over to this website now!
Even though they are sometimes used interchangeably, financial advisors and financial planners are not the same thing. For those looking to hire help with their finances, knowing the difference between the two is essential.

When it comes to helping people with their money and investments, the phrase “financial advisor” covers a wide range of service providers. This category comprises numerous professionals, such as investment advisors, wealth managers, and insurance agents, who focus on specific parts of financial management.
Instead, financial planners are a subset of financial advisors who take a more holistic approach to their client’s financial health. Budgeting, retirement, tax, and estate planning are just a few of the many facets of financial life that financial planners help their clients navigate as they assist them in developing long-term financial objectives and actionable plans to attain those goals.
Financial planners and advisers perform similar functions, but there are important distinctions between the two that we’ll discuss in this post. By getting a greater knowledge of these disparities, individuals can make informed judgements when seeking professional aid in navigating their financial destinies.
Although the phrases are sometimes used interchangeably, there is a distinction between a financial advisor and a financial planner. What sets them apart is the specificity and breadth of the services they offer, click here.
In other words, while all financial planners can be thought of as financial advisors, not all financial advisors can be called financial planners. Having the job title of “financial planner” suggests a more comprehensive and strategic approach to managing a client’s money. It’s crucial for people looking for financial advice to know what to expect from the various specialists who use these terms so they can pick the one whose knowledge best fits their situation.
To answer your question, a financial planner is a subset of financial advisors. While the phrase “financial advisor” can refer to a wide range of people who provide advice on money concerns, a “financial planner” refers to a more narrowly focused expert. When working with clients, financial planners create all-encompassing plans that address all of their monetary needs, not just investments or insurance.
While any financial planner can be considered a financial adviser, not all advisors necessarily offer the whole range of services that make up financial planning. In common parlance, a “financial planner” is someone whose job is to help their clients achieve their long-term financial goals through the development of personalised plans.
One way in which financial planners might set themselves apart is by emphasising comprehensive planning. They look into the specifics of each client’s situation, taking into account their income, outgoings, assets, liabilities, and desired outcomes. Planning for one’s financial future is the focus of financial planners, as opposed to the narrower expertise of some financial counsellors.
This all-encompassing strategy incorporates financial planning across the board, from investments to retirement to taxes to estate planning to risk mitigation via insurance and beyond. To create strategies that are adaptable to the inevitable ups and downs of life, financial planners place a premium on getting to know their customers’ hopes and fears.
The terms “financial advisor” and “financial planner” are sometimes used interchangeably, but for those who want a more comprehensive and tailored approach to their financial well-being, knowing the difference might be vital. Financial advisors and planners both help customers make educated decisions about their money and sort through the tangled web of their finances.
A financial advisor is an expert in the field of providing advice and direction on money matters. Their primary focus is assisting clients in achieving their financial objectives by providing them with the knowledge and tools necessary to make sound financial decisions and effectively manage their assets. The following are some of the primary roles and functions of a financial advisor:
Investment advice, estate planning, and retirement planning are just some of the areas in which financial advisors might specialise. Individuals seeking the assistance of a financial advisor should do their due diligence to ensure that their needs and those of the advisor are compatible. For the sake of openness and trust in the advising relationship, it is also important to know how the advisor is paid (e.g., by fee or commission).
For both people and organisations, having access to a reliable financial counsellor is essential. These experts provide invaluable insight to help clients achieve their financial objectives, whether they need assistance with investments, retirement planning, or a more holistic approach to financial planning. Financial advisors help their customers in the long run by taking stock of their existing financial problems, establishing reasonable goals, and implementing actionable plans.
Individuals should take their time finding a financial advisor whose expertise is a good fit for them, and then keep lines of communication open so that they may make modifications as their lives change. If you’re serious about improving your financial situation, finding a reliable financial counsellor is a crucial first step.
The eradication of rodents like rats and mice is an essential component of effective pest management in a wide variety of environments, including private residences, agricultural settings, and commercial institutions. Rodenticides are one of the most popular forms of pesticides that are utilised for rat and mouse eradication. Pesticides play an essential part in this endeavour. Rodenticides are chemical substances that have been developed expressly to destroy rodents efficiently.

When it comes to dealing with rodent infestations, one of the most important things you can do is arm yourself with as much information as possible about the different kinds of rodenticides that are on the market, how those rodenticides work, how safe they are, and the best ways to apply them.
To effectively manage rodents, it is vital to have a solid understanding of the various rodenticides and their applications for each of them. This is true whether you are a homeowner wanting to safeguard your property or a professional pest control operator.
It is standard parlance to call pesticides designed to kill rodents “rodenticides.” Rat and mouse populations can be reduced with the help of rodenticides, which are chemical substances developed with that purpose in mind. These compounds are often sold as a variety of baits, pellets, powders, and blocks, all of which are designed to entice rats.
Various rodenticides exist, each with its unique mechanism of action. The most common kinds of rodenticides are:
It’s worth stressing that rodenticide use needs to be strictly controlled since it must adhere to state and federal laws. The use of rodenticides should also be addressed with caution due to the dangers involved, such as the possibility of harm to non-target species and environmental contamination. When dealing with rodent infestations, it is generally suggested to seek the advice of a professional pest control operator to ensure the implementation of safe and effective rodent control procedures.
What kind of rodents are present, how extensive the infestation is, and what other elements are at play all affect how well rodent control methods work. Although there is no “magic bullet” for rat and mouse control, the most successful methods typically involve several IPM (integrated pest management) techniques. Some essential features of a comprehensive rodent control programme include the following:
It’s crucial to remember that your rodent control strategy should be tailored to your specific scenario and that a combination of these measures is often the most effective approach. In addition, it is essential to give top priority to safe and humane practices while minimising dangers to non-target species, pets, and people.
The toxicity of a pesticide to rats can change based on the chemical compound used and the way it’s packaged. Among rodenticides, second-generation anticoagulant products are notoriously lethal to rats. These chemicals prevent blood from clotting, which results in massive, uncontrolled bleeding and ultimately death. The following are examples of anticoagulant rodenticides from the second generation:
These rodenticides are available in a variety of different forms, such as bait blocks, pellets, and grains, and they need to be handled with the utmost care by all of the appropriate safety and regulatory standards. Due to the toxicity of these substances, they should not be used to manage rodent populations unless all other, less damaging methods have been unsuccessful.
It is recommended that tamper-resistant bait stations be used and that the medications themselves be stored in a secure location that is out of reach of both children and animals. This will help limit the risk of accidental ingestion even more. When working with a pesticide, you must take all of the appropriate safety measures, including carefully reading and according to the product’s instructions.
It is necessary to have excellent rodent management to successfully manage rodent infestations in a variety of contexts. Even though there is a wide variety of approaches and chemicals available for pest management, selecting the appropriate pesticide is often the most important factor in determining the level of effectiveness achieved.
Anticoagulant rodenticides of the second generation, such as brodifacoum and bromadiolone, are extremely lethal to rats and are frequently applied in extreme cases of rodent infestation. Because of the potential dangers that these compounds offer to non-target organisms as well as the environment, they must be utilised with extreme caution and by all applicable safety norms and regulations.
In an ideal world, rat management would involve taking a holistic approach, integrating tactics such as excluding rodents from the area, maintaining good cleanliness, setting traps, and, if required, using rodenticides with extreme caution. A strategy for controlling rodents that is both safe and successful should include monitoring for telltale indicators of rodent activity and, when necessary, seeking the assistance of trained professionals who specialise in pest control.
A crucial component in reducing the likelihood of recurrent infestations and keeping an area free of rodents is providing education on the behaviours of rodents and the preventative actions that may be taken. When it comes to rat management, you should always emphasize using methods that are both humane and safe to safeguard the health of both humans and the ecology.
Looking for Rodent Pest Control, Treatment and Removal Services in Melbourne? Here’s the answer to all your problems! Click the original site now!
The amount of time you spend tending your garden on your own versus hiring a professional might vary greatly based on several factors, such as the size and intricacy of your garden, your tastes, and your financial situation. Some people choose to hire a gardening service every week to keep their landscapes looking perfect and manicured, while others may just want assistance on a seasonal or occasional basis to complete specific chores.
In this article, we will discuss the factors that should serve as a basis for your decision regarding the frequency with which you engage the services of a gardener.
This will enable you to strike the optimal balance between a thriving garden and the resources at your disposal. If you want your outdoor space to continue to be a source of beauty and pleasure, it is important to have a good understanding of the best gardening schedule, regardless of whether you are a green-thumb enthusiast or a hands-off homeowner.
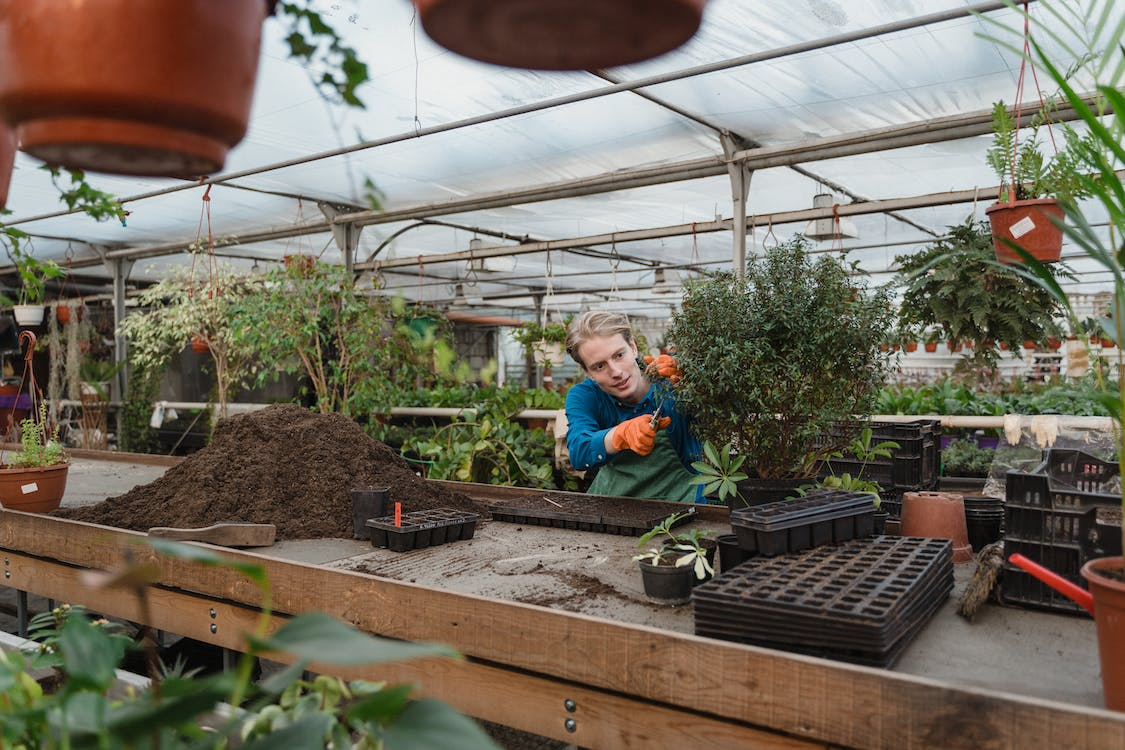
Someone who tends to gardens, landscapes, and other outside areas is called a gardener. They have extensive experience with planting, cultivating, pruning, and landscaping, among other facets of horticulture. The goal of many gardeners is to maintain a beautiful and healthy garden full of plants, trees, and bushes.
Lawn mowing, weeding, fertilising, and insect control are just some of the chores that could fall under their purview. Whether they work in private gardens, on commercial grounds, or in public parks, gardeners are essential to the success of any outdoor space. Gardens that are gorgeous, full of life, and well-kept are all made possible thanks to their expertise and care.
The regularity with which you should hire a gardener is contingent upon several criteria, such as the size and complexity of your garden, the gardening skills you possess, the amount of time you have available, and your financial constraints. The following are some examples of typical work schedules for gardeners:
In the end, how often you choose to hire a gardener is a matter of personal preference that is determined by the requirements of your garden as well as your unique circumstances. The optimal plan for your gardening services can be determined by conducting regular inspections of the state of your garden as well as an evaluation of your capacity to care for it.
The value of hiring a gardener is highly variable and is according to your particular requirements, personal preferences, and the characteristics of your garden. The following are some important considerations to make when considering the significance of a gardener:
The significance of hiring a gardener is highly dependent on both your individual preferences and the requirements of your garden. Others prefer to hire a professional gardener.
They value the expertise and convenience that they give, whereas those who do the gardening themselves do so because they love the hands-on experience of the activity. If you want to establish whether or not hiring a gardener is necessary for your outdoor area, it is essential to evaluate the requirements of your garden as well as your abilities and preferences.
The decision as to whether or not you need a gardener in your life and for your garden is impacted by several different circumstances. Gardeners can offer essential expertise, talent, and consistency to the care of your garden, saving you time and effort while improving the health and beauty of your outdoor space.
Gardeners can help you save time and work while improving the health and beauty of your outdoor space. They can adapt their services to match the specific requirements of your garden, deal with issues as they crop up, and add to the overall worth of your property.
However, whether or not you decide to engage a gardener ultimately depends on your circumstances, personal tastes, and the requirements that are unique to your garden. Some people who are passionate about gardening find it rewarding to take care of their gardens on their own, while others recognise the value in having a gardener take care of their plants for them and provide a more professional touch.
The trick is to strike a balance that allows your garden to continue to be a source of beauty and pleasure while also being in keeping with your financial situation and the way you live your life.
Looking for a trusted Gardener in Mouth Waterley? Here are garden supplies mt waverley to help you! Book your appointment today!